fbpx

Author Archives: Rich Tozzoli

Real-World Review: Avid MBox Studio and Avid Carbon Pre

Avid MBox Studio and Carbon Pre, in use at Clubhouse Studios, Rhinebeck, NY.
MIX VERDICT: Avid MBox Studio and Avid Carbon Pre
THE TAKEAWAY: “Simply put, the MBox Studio, MBox Control software and Carbon Pre kicked ass at their respective jobs. All of us involved would take this rig into battle anytime.”
COMPANY: Avid • www.avid.com
PRICE: MBox Studio: $899 / Carbon Pre: $2,999
PROS:
• Having Bluetooth in MBox Studio is remarkably useful.
• MIDI In and Out was a big help.
• MBox Control software aided overall efficiency.
• On-board talkback mic and built-in tuner help a lot.
CONS:
• When MBox Control software is open, Pro Tools controls are disabled.
• Pro Tools functionality mapping to the User Action buttons and footswitch inputs isn’t available yet (but Avid says it’s coming).

Recently, I was lucky enough to gather a talented group of people for an open-minded test drive of two of Avid’s latest releases—the MBox Studio and 8-channel Carbon Pre.

We set up shop at Clubhouse Studios in Rhinebeck, N.Y., where engineer Mark Everton Gray (Imagine Dragons, Joe Bonamassa, Santana) worked with myself, drummer David Koch and keyboardist Bruce MacPherson to record in a real-world live session. We were also blessed to have veteran drum tech Jeff Ocoltree on hand, who’s worked with the likes of John Bonham, Billy Cobham and Steve Smith. This cast of characters was armed and ready to have some fun with new gear.

In this review, we won’t examine the nitty-gritty of all the knobs and buttons, but provide an overview of how the gear was used to create music needed for several TV shows. We tracked through nothing but the MBox and Carbon Pre, bypassing Clubhouse’s vintage Neve 8068 MkII console, allowing us to judge the units only by what we experienced and heard.

First, though, a little info on each.
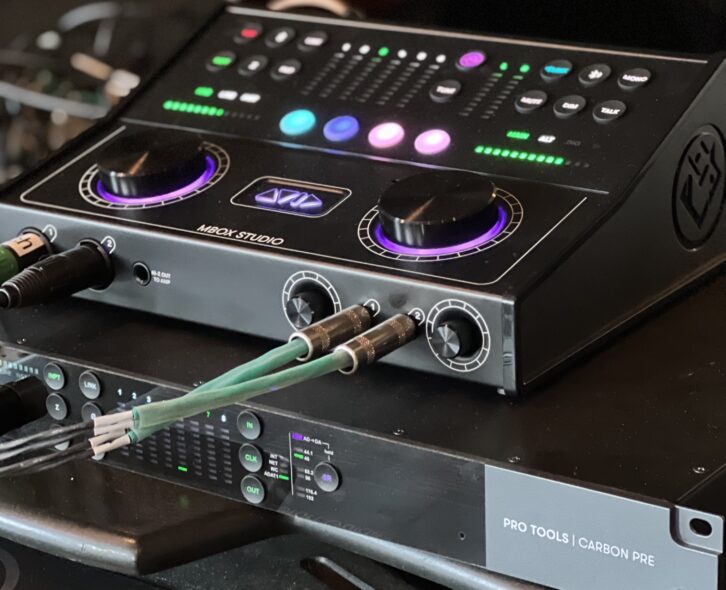
MBOX STUDIO

MBox Studio is a USB audio interface powered by Pro Tools Studio software. It features 24-bit/192 kHz audio performance and a host of features far beyond the MBox of old.

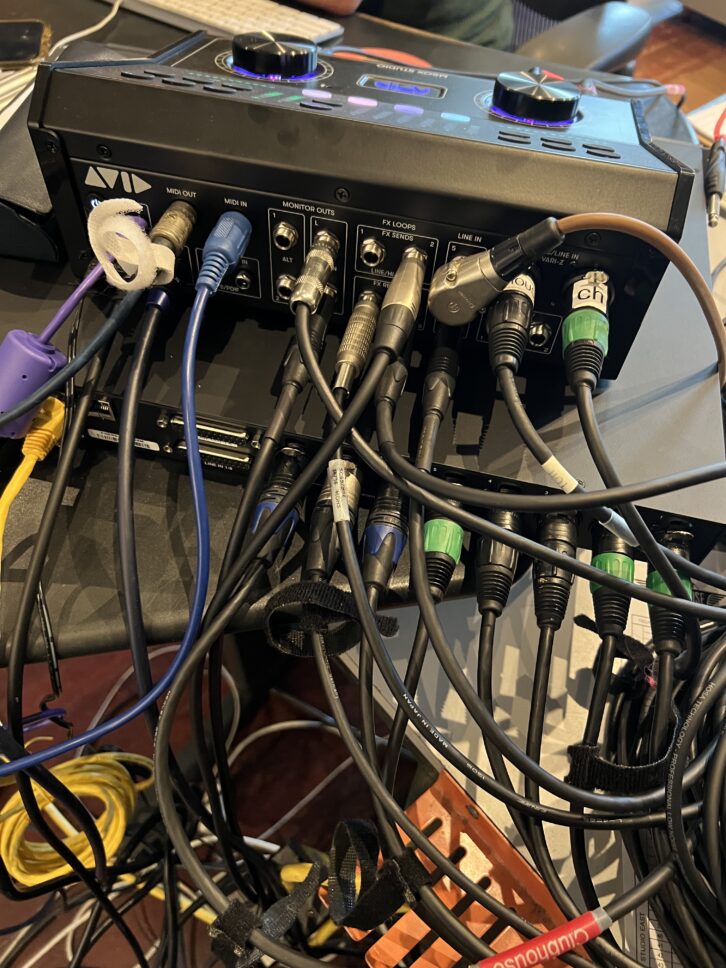
The 21 x 22 simultaneous I/O (at 24-bit/96 kHz) includes low-latency tracking with built-in EQ, reverb and delay from Avid FX, premium A/D conversion, four mic preamps/line inputs with variable Z impedance, two variable Z instrument inputs and four additional line-level inputs. You also have two impedance-switching effects loops, two-way simultaneous Bluetooth I/O, optical I/O with 8-channel ADAT or 2-channel S/PDIF, coaxial SPDIF I/O, MIDI I/O and two footswitch/expression pedal inputs.

Outputs include two stereo monitor outs, one impedance-matched HI-Z reamplification output with ground lift, two headphone outputs with an independent cue mix control, and a talkback mic.

There are four assignable, dual-function buttons on the front, I/O metering, a large knob for volume and a large knob for functionality, such as preamp levels, etc. It’s all housed in a sturdy, black, anodized unit that packs a lot of features into a relatively small footprint.

With purchase, you get the MBox Studio audio interface, MBox Control software, MBox Ignition Pack plug-in bundle, Pro Tools Studio software (one year), Sibelius Artist (one year), USB-C and USB-C female to USB-A male adapter cables, and the power supply.

It’s important to note also that you can use MBox Studio with other DAW software aside from Pro Tools, such as Cubase, Logic Pro and others.

CARBON PRE

Carbon Pre is an 8-channel preamp with 32-bit/192 kHz conversion, allowing you to not only expand a Pro Tools Carbon-powered system to 24 channels, but operate independently as a stand-alone unit for an HD system or simply on its own for your own DAW. Each unit has eight mic/line preamps Up to nine Carbon Pre units can be integrated in an HDX/HD Native system via optical I/O, with the ability to remotely control and recall preamp settings right from your Pro Tools software through Ethernet connectivity.

It includes stacked ADCs, double-precision clocking, two hi-Z instrument inputs, 8-in/8-out line I/O, word clock I/O, ADAT I/O, and it’s EUCON-compatible. We used it to add eight additional preamp channels connected optically via ADAT to the MBox Studio.

THE ENGINEER’S SETUP

For setup, engineer Mark Everton Gray was responsible for the recording, allowing myself and the gang to focus on the music and overall big picture. Gray says:

“In order to get the maximum amount of channels from this rig, I began by connecting the 8-channel Carbon Pre to the MBox Studio via optical cable In and Out. The computer was my M2 MacBook Pro 13-inch with 24 GBs of RAM running Monterey OS version 12.6.1. Because it only has two Thunderbolt 3 ports and a mini-jack port, I used an OWC 14-port Thunderbolt 3 dock to make all the necessary connections, including an Ethernet cable to Carbon for a firmware update, and remote control over the preamps from Pro Tools.

“With Carbon Pre connected to the MBox Studio, which was now the clock master, we had 16 simultaneous inputs for tracking. The setup included 13 channels for Dave’s drums and three channels for guitar—two mics for the amps and one clean DI signal from a SansAmp BassDrive DI. The second guitar pass (Rich overdubs everything twice with two different amps), bass, keyboards and percussion would all be overdubs after the initial live tracking pass. Note that the setup also included four channels of my API 512C Lunchbox, connected to MBox Studio’s four line inputs.

It may look a bit tangled, but proved an incredibly efficient use of I/O.

“Once everything was connected, I installed the latest MBox Control software and the latest version of Pro Tools using Avid Link, which makes the process quite simple. MBox Control is a separate application that runs simultaneously with Pro Tools. It’s where you can set your preferences, do all your routing within the Mbox Studio, as well as add latency-free EQ, compression, reverb and delay for tracking.

“For headphones, I ran the main outs to mults on the patch bay, then patched that to Clubhouse’s Manley Langevin headphone stations in the live room. For control room playback, I used the mults to go back into the Neve so we could use the main monitors, a pair of PMC 6-2s. However, I did use the headphone outputs on the front of the MBox for session editing purposes afterward.

“Everything was literally new out of the box, so it did take a little getting used to. Thanks to some online tutorial videos and a well-written manual, it progressed quickly and was quite easy overall. I used MBox Control to adjust all the inputs and outputs, figuring out the proper headphone feed with click tracks to the guys in the live room.

“Since we were on a deadline, we worked fast. Both the software and hardware kept up with

the flow of the session and delivered everything I needed. In fact, one track we did for a show on the A&E channel was created, recorded, mixed and uploaded to the client within one hour. This setup allowed that, and the entire session, to flow effortlessly.”

BACK TO THE BIG PICTURE

Afterward, we all agreed on a few things. First, this rig rocked. It had the right combination of efficiency and audio sonics to handle a high-level, real-world session. Yes, we had great microphones (see sidebar) and a superb live/control room, but the MBox/Carbon Pre setup delivered the goods in every way. We all have had MBoxes throughout our careers, but this was nothing like the others—not even close. It’s a sturdy and flexible little powerhouse that sounds like it looks.

One issue that we came across in our session was that with the MBox Control software open, Pro Tools controls, such as spacebar to start playback, were disabled. Since we were moving fast, it did slow us down sometimes. However, MBox Studio senior product manager and product designer John Whitcore noted, “If you’re using EuCon and Avid Control or a dock, etc. then you always have control regardless of what the active app is. With that said, we do plan on adding Pro Tools functionality mapping to the User Action buttons and footswitch inputs on MBox Studio, so you’ll also be able to do transport control that way.”

UA Hitsville USA EQ Collection – A Real-World Review

Onkart Gromt Grompressor – A Real-World Review

Audio Ease Altiverb 7 – A Real-World Review

Overall, there were a few “rock star” features that stood out on the MBox Studio during the sessions. Having Bluetooth is remarkably useful and a very intelligent inclusion. MIDI In and Out was super-useful, letting keyboardist Bruce MacPherson integrate an Oberheim OB-X8 into the session to automate some filter sweeps. He also connected the Oberheim to the expression pedal input in order to merge expression and note information on a track.

The reamp feature was used extensively, where Gray reamped a bass into an old Ampeg B18, the guitars into a Mesa Boogie MK IV, and snare drums into a hardware EMT 140 plate and an AKG BX 15 spring. MBox Control was great for its overall efficiency, including the use of onboard effects during tracking. The inclusion of a talkback mic, as well as a built-in tuner, have to be on the list as well.

Most importantly, we got a lot of music done in a short period of time, and it sounded great. That’s what the test was all about: Simply put, the MBox Studio, MBox Control and Carbon Pre kicked ass at their respective jobs. All of us involved would take this rig into battle anytime.

Leapwing Al Schmitt Signature Plug-In Review

The legendary Al Schmitt

How do you capture the essence of a legendary engineer/producer with 23 Grammys, 160 gold and platinum albums and a ‘who’s who’ resume, and put that into a piece of software? Well, that’s just what Leapwig and the iconic Al Schmitt went for with the new Al Schmitt signature plug-in. The team literally encapsulated his gear, mixes’ textures and workflow to come up with something that ambitious.

When first opening the plug-in, you select from a Source dropdown menu that offers up Vocal, Bass, Brass, Mix, Piano or Strings. These are referred to as ‘profiles’ and each of them are tuned differently with their own character and tone. Each profile also features a different ‘tuned’ amount of harmonic distortion. Within each profile, there are a number of options as well—for example, Vocal features Body Level, Air Level, Echo Level, Compression, Air Type and Echo Type.

This approach to plug-in design has led Al and the team at Leapwig to create something that operates in a unique fashion. When audio is played, rings that represent loudness are played around the relevant icon in the center in real time. If there is something like gain reduction happening, the outer rings tighten up accordingly at ½ dB per ring. For instance, if there are four rings happening, you’ve got 2 dBs of reduction. It’s something your eyes have to get used to because it’s simply a new way of operating.

The METAlliance Report – Al Schmitt, Frank Filipetti Talk Miking

Since each source features its own customized parameters to tweak, you quickly adjust to how to get around. For example, Mix features Sub Boost, Low, Mid and High Level, Low, Mid and High Comp, a compressor link and Air Boost. Bass is nothing but Compression, Body Level and Air Level, but it includes additional harmonic distortion within those parameters. Piano, which is one of my favorites, features Compression, Echo Level and A/B/C Echo Type. Note that “echo” is actually a reverb, a name that was chosen since that is what Al calls it. Aside from that, there’s In and Out Meters with up to 12 dBs of gain.

Leapwing Al Schmitt Signature Plug-In

What I like about this plug-in is that you can dial in some taste very quickly. When first listening, it helps to run through each source to understand what the parameters do. To hear the echoes clearly, I would simply put on audio with attack and stop the transport, listening to what sound is created afterwards. The others, such as Sub, Air bands and EQs are easy to hear. Compression is subtle yet clearly audible. I found it useful to also mix and match—for example, using the compression in the bass source on something like a piano. Then, if I wanted more, I put another instance after in the DAW and used the EQ in Echo in the Strings source, or the EQ and Air settings in the Mix source. Once you have a feel for it, your instinct knows where to go. I saved a number of presets for easy recall: I like Echo Type C on the Strings source, so that’s now my “RT Echo 1 Strings’ preset, and I also captured a nice Mix bus preset with Sub Boost, Air Boost a few dBs of Gain and a touch of Highs as “AS Master 1.”

The METAlliance Report: The Recording of Steely Dan’s ‘Aja’

Aside from being easy, this plug is fun to use. You can get to a sound with just a few quick fader slides and most importantly, it works as advertised. It’s not big, bold and aggressive, but subtle and tasty, especially in the reverb/echo fields. Most importantly, all of these sounds are clean, clear and tasty. I would also use the word “refined,” which is a testament to the team making it. Since you probably can’t get him to your session, now you can bring a little of Al Schmitt’s magic sonic touch to your own tracks.

Rich Tozzoli is an award-winning, Grammy-nominated producer, engineer and composer for programming such as FOX NFL, Pawn Stars and Oprah & Deepak Chopra. www.richtozzoli.com

Avid Pro Tools 2020.11’s New Features – A Real-World Review

Avid Pro Tools 2020.11’s new Routing Folder feature.

Having worked with Avid’s new Pro Tools 2020.11 and likewise new Carbon interface for some time now, I wanted to highlight a few fresh features that I’ve found useful in the daily workflow.

Routing Folder: This organizational tool lets you select tracks and route them into a neatly packaged folder which behaves like a traditional Aux channel on steroids. There are two approaches to this—you can create the Routing Folder then put tracks into it, or select tracks and create a Routing Folder directly from them. For me, the value of the Routing Folder is that you can process it like an Aux, but then collapse it with the click of a button. You still have access to Solo, Mute, Insert, Send and so on.

For organization, you can collapse the entire folder structure by clicking on the small folder Icon at the bottom of each Routing Folder; simply click it again to unfold it back. Also, when in the Edit window, you can place the insertion point anywhere in a Folder track and select Shift-F to toggle between closed or open.

If you already have an Aux track setup for such purposes, you can also just click on the Aux and select ‘Convert Aux to Routing Folder.’ You could also just create a ‘Basic Folder,’ which has the same functionality minus the ability to process or route. Folders can also be created within folders for additional sub processing.

By using these folder tools, it makes the session much more streamlined both visually and functionally.

Apple Mac Pro Rack: A Real-World Review

Convert Audio to MIDI: There’s only one word for this feature: Wow! With Pro Tools 2020.11, you can take audio tracks from your timeline and convert them into MIDI files. By selecting your audio clip and dragging it onto an Instrument Track, a Menu box appears with the ability to choose Automatic, Universal, Percussive, Percussive Pitched, Melodic, Polyphony Sustain or Polyphony Decay Conversion Types, and it offers you the option to Consolidate the Clip. You can also choose selections from the Clip List, by selecting the Copy Audio as MIDI dropdown menu option. From there, just drop the Audio Clip with its associated MIDI track to the Timeline. It’s that easy.

All of this is enabled through the authorization of Melodyne in your Pro Tools account. Pro Tools subscriptions and Software Update + Support Plans come with Melodyne 5 essential, which, aside from helping with the Convert Audio to MIDI, allows you to fix those questionable notes.

The first thing I did was take a recorded bass track and turn it into MIDI. From there, I tweaked a few note lengths (only had to do a few!) and assigned it to an Omnisphere stereo sub bass patch. The combination together was ridiculous. I then took a kick drum and turned it into MIDI, assigning that to an 808 kick in another piece of software. Imagine where we can go from here.

Dark Theme: For those who like the drama of the dark side, you can alter how the Mix and Edit windows look. By going to Preferences > Display > UI Theme, the dropdown menu lets you select between Classic or Dark. If you select Dark, Pro Tools will ask you to restart for the UI theme change to take effect. After restarting, you’ll notice a whole new world of color attitude. I like it just for a change of mindset, and I hope to see more adjustments available for it in future updates to allow for various gradients and more. It is cool, though, for the late evening sessions or when you want to lower the lights and have some attitude.

Avid • www.avid.com

Apple Mac Pro Rack: A Real-World Review

The Mac Pro Rack dominates the 10 RU rack that houses it in Rich Tozzoli’s workspace.
The Mac Pro Rack computer dominates the 10 RU rack that houses it in Rich Tozzoli’s workspace.

If there’s one thing that we studio people like, it’s consistency in our gear. As the primary brains to most setups, the computer is central to that theme, so when my trusty Mac Pro “cheese grater”—which ran perfectly for 10 years—went down for the count a few months ago, I didn’t take it lightly. It was time to make some big decisions. I weighed the basic questions we should always ask ourselves when upgrading: Do I stay with my current platform (a Mac, in my case)? What’s my budget? What’s the latest hardware on the market to fit my I/O needs? Am I buying for the short term or long?

Over the last few years, I thought about upgrading my old Mac Pro, my primary DAW platform, when I ran into roadblocks with OS upgrades, software and Pro Tools compatibility, but the little “trash can” shape that Apple used for Mac Pros manufactured between 2013 and 2019 just didn’t work for me. I didn’t want to put my Avid HDX card and my UAD Octo card into a chassis. The trash can form factor is now history, however. After working on my laptop for a few months to get me through my “crisis,” I made the move and went big with a new Mac Pro Rack.

Inside the Apple Mac Pro Rack
Inside the Apple Mac Pro Rack Apple

Luckily for me, my friend, producer/drummer extraordinaire Omar Hakim, had recently been through the whole process, so I had a guide. “Right before I got my new Mac, my ‘trash can’ suffered a catastrophic thermal meltdown,” he told me. “I ended up using a laptop for a few months while I was waiting for the release of the new Mac Pro Rack. I settled on a 12-core Mac Pro Rack model with 96 GB of RAM, a 2 TB factory SSD card and a base video card. I added two 2 TB internal Samsung SSD EVO 970 NVMe M.2 cards with two Vantec PCIe adapters—components I purchased, assembled and installed myself. I then loaded up my two Avid HDX cards and Universal Audio Satellite PCI card. My studio has never run smoother!” He noted that he purchased the base amount of RAM from Apple and bought the rest from OWC.

With his feedback in mind, I made the decision to purchase a Mac Pro Rack over an iMac Pro or Mac Mini. I visited Apple.com and went through the process of ordering the components I wanted: a 3.2 GHz 16-core Intel Xeon W processor-based machine with the base 32 GB of 2933 MHz DDR4 RAM to get started.

I also worked with Rob Zenn at Alto Music on this purchase; Zenn convinced me to get the AMD Radeon Pro W5700X 16 GB graphics card, as it includes four additional powered Thunderbolt 3 ports. We made sure the hardware came with macOS Catalina version 10.15.5 installed so as not to get into conflicts with the upcoming Big Sur OS release.

The good news: I had a machine that would rock. The bad news? It came to a whopping $9,900. However, since this is the brains of my setup, which I use every day to compose, mix or create music, I judged it to be a good allocation of funds. Besides, it’s a tax write-off!

The new Mac Pro Rack was quickly teamed up with the brand-new Avid Carbon interface.

When the machine arrived, crated in foam, I couldn’t believe what a monster it was. It’s built like a tank. I was taken aback by its design and downright sturdiness. I’ve had a lot of Macs in my day, but nothing like this. It came with eight PCI Express expansion slots, two of which were filled by my Avid HDX card and the Universal Audio UAD-2 OCTO card.

Engineer Mike Dwyer and I slipped on the heavy-duty rack rails (sent separately from Apple) and slid it into the 10-space rack I purchased for it. We hooked up an HDMI video cable from my Samsung to the Mac, set up the cool black wireless keyboard and mouse, and fired it up. Within a few minutes, it was game on.

Next, we attached a single AVB Ethernet cable from my new Avid Carbon interface (which I reviewed last month) to the Mac Pro, and plugged in a Native Instruments Komplete Kontrol S88 Mk2 keyboard and PreSonus FaderPort 8 into two of the included USB ports. I had made an Apple Time Machine backup of my laptop the night before and saved the data on a portable SSD drive, which I hooked up to the new computer.

REAL-WORLD REVIEW: Avid Pro Tools Carbon Production System

Using Apple Time Machine’s Migration Assistant, I transferred the files from my backup to the new Mac Pro Rack, and while it took almost two hours, everything transferred over to the new Mac: Pro Tools 2020.11, Reason, all of my Vienna Instruments, Omnisphere, Universal Audio Console and all of my plug-ins. I opened Pro Tools and everything simply worked. With just a few software updates, it was the easiest migration I’ve ever experienced.

This week, I’m ordering 32 GB more RAM and a few SSD internal drives to load the chassis up even more. It’s been flawless in its performance so far, and not even my heavy virtual instrument sessions can choke it. For the first time, I’ve found a machine that works faster than I do, which has already helped my creativity. For me, it’s already worth the money.

Apple • www.apple.com


REAL-WORLD REVIEW: Avid Pro Tools Carbon Production System

Avid’s new Pro Tools Carbon is a hybrid audio production system based around a hardware interface with onboard HDX DSP acceleration that works in conjunction with your native computer’s CPU.
Avid’s new Pro Tools Carbon is a hybrid audio production system based around a hardware interface with onboard HDX DSP acceleration that works in conjunction with your native computer’s CPU. Mike Taylor

I can honestly say that Pro Tools is a vital tool in my daily workflow, so when Avid sent an advance unit of Pro Tools Carbon my way, I was anxious to put it through its paces and see what it could do on some real-world sessions.

Avid’s Pro Tools Carbon is a new hybrid audio production system starting at $3,999 that combines a hardware interface with onboard HDX DSP acceleration and your native computer’s CPU power. With this Hybrid Engine, you can track and monitor with near-zero latency when using AAX DSP plug-ins. Intelligently, when you put a track into DSP Mode for recording, the chips in Carbon process the AAX DSP plug-ins while the computer plays back your mix in Native mode. Simply switch off the tracks in DSP Mode and the whole session is back in Native Mode, ready for mixdown.

Let’s take a quick look at the Carbon hardware, then get into how it all works together. The sleek 25×34 simultaneous I/O, 19-inch, 1U rack-mountable interface features two variable Z, unbalanced, ¼-inch TS instrument inputs on the front, as well as four separate stereo headphone outputs. There are eight 20 Hz to 20 kHz XLR Mic/Line preamps on the rear (four of which have Variable Impedance), as well as eight channel Line In and Line Out DB25 25-pin D Sub multipin connections. There’s a TRS Monitor L/R Main output, ¼-inch footswitch connector for talkback on/off, WC I/O and two Ethernet connectors. Also on the rear are a pair of ADAT optical inputs and two ADAT optical outputs, offering 16 channels at 44.1 – 96 kHz and eight channels at 176.4 – 192 kHz.

Avid Launches Pro Tools | Carbon

Back to the front panel—you’ve got eight separate LED meters for the Mic/Line inputs and a Main L/R stereo out meter. Input levels are controlled with the Input Encoder knob on the left, which, when pressed, switches between Mic/Line, as instrument input is automatically detected. The Input Level Strip displays input source and amount of gain.

There are buttons for Input Selection, Z for impedance choices, Link, Phase, Phantom Power, Input Metering, Integrated Talkback, Output Metering and another knob for main output and headphone levels, as well as a master Mute button, Headphone button and DIM button. EXT or NET indicators light up on the front when properly connected to their source. The Output Encoder knob controls headphone and monitor (Main/Alt 1/Alt 2) out, indicated with the Level Strip above it.

Under the hood lies the all-important eight HDX DSP processors (2.8 GHz aggregated processing), which allow all of this hybrid production to take place. Note that at launch, all preamp and monitor controls will be from the front panel, but remote control is at the ‘top of the list’ for the upcoming updates.

Since I do production and TV composing from my own studio and in a variety of locations, I have long used my own ‘hybrid’ system of recording. I go ‘Native’ with my mobile rigs, based primarily around a MacBook Pro and several interfaces, and ‘combo’ on my main HDX system, with an HD I/O hooked up to a MacPro. It works, but Native-only production tends to frustrate me with latency and buffer sizes and so on.

That’s why Carbon is a different animal. To integrate it into my system, I simply connected an RJ 45 Ethernet cable from Carbon to my MacPro and selected it in the Network Device Browser on the computer. I then hooked up both the Main L/R outputs and ADAT output 1 into my Grace Design M906 Monitor controller. Since I run a lot of guitar-centric gear and pedal boards into my Manley, Millennia and Universal Audio preamps, they connected via a DB25 to the analog input on the rear of Carbon. My Grace Design m108 8-channel preamp connected via ADAT optical input 1 and now shows up on ADAT 1 of the Input Tab in the I/O setup.

Pro Tools | Carbon
Avid Pro Tools | Carbon

Literally within a few minutes, everything was connected and simply worked. It was remarkably seamless and since it’s connected via AVB Ethernet, you not only get 32-bit end-to-end workflow, but your regular computer audio will play back directly through the converters of Carbon.

Top Guitar Miking Tips—How to Capture a Roaring Guitar Amp

With Carbon, it’s all about DSP Mode. Each track has the ability to switch from Native to DSP Mode, which can be enabled for Audio, Aux, Instrument, Routing Folder and Master Fader Tracks. When selected, the small ‘lightning bolt’ icon turns from gray to bright green and all plug-ins on the track switch from Native to DSP (if a DSP equivalent is available). DSP Compatible plug-ins are identified with a DSP Compatible badge.

At this point, the entire signal path for the track will then run on the HDX DSP mixer in Carbon. Any Native-only plug-ins will be automatically bypassed in DSP Mode. What’s cool is that any tracks associated with a track put into DSP Mode (light green lightning bolt) are automatically also put into DSP Mode (dark green lightning bolt). This would include tracks being bussed to downstream (subgroups, routing folders), as well as effect return tracks from sends.  For effect returns, if a plug in does not have a DSP equivalent, the track can be placed in DSP Mode Safe. This places the track back onto the native mixer with a slight predelay. Note that you can also set DSP Mode to enable automatically when putting a track into record, and you can also set tracks into DSP Mode Safe to prevent DSP Mode from being auto-enabled.

So what this all means is that I was able to track my guitars through DSP plug-ins and some of my favorite effects with virtually zero latency, which is the only way to get that “feel.” Note that you can also use Aux tracks to put external reverbs, delays, etc. that have no DSP equivalent, into DSP Mode Safe. The main record tracks are running DSP with sub ms latency, but the reverb return is still on the Native mixer live, so your playback buffer is still relevant to the plug-in. This all adds up to me using Pro Tools for what it’s for—seamless creativity without technology getting in the way. Yes, it might require some forethought on DSP plug-ins, but it’s worth it.

Carbon is Mac-only at launch, with PC support hopefully added in the future. For those without Ethernet ports on your computer, you’ll need to use a qualified Thunderbolt-to-Ethernet adapter; check Avid’s website for compatibility data. Also, the computer has to be qualified with macOS 10.15.7.

Also included in the package are a one-year subscription to Pro Tools software with its 115 AAX plug-ins (more than 70 AAX DSP plugins), a 5.4 GB sound library and standard support, and there’s also an additional selection of partner plug-ins from Arturia, McDSP, Plugin Alliance, UVI, Native Instruments and Embody.

Essentially, in one hybrid system, Pro Tools Carbon lets users have the best of both worlds: AAX DSP and Native. Carbon is a creative game changer in a lot of ways, and I can’t wait to see—and hear—where this is going.

Rich Tozzoli is an award-winning, Grammy-nominated producer, engineer and composer for programming such as FOX NFL, Pawn Stars and Oprah & Deepak Chopra. www.richtozzoli.com

Avid • www.avid.com/carbon

Top Guitar Miking Tips—How to Capture a Roaring Guitar Amp

There’s nothing quite like the sound of a nasty cool guitar amp or cabinet. The fiery attitude, grit, edge and sometimes extra volume is truly something to behold—and to be heard! But how do you get that huge sound to translate to small speakers, including the ones that go in your ears? Let’s look at a few mic techniques to help make that happen, and we’ll also get some guitar miking tips from Grammy-winning producer/engineer/mixer Neil Dorfsman (Dire Straits, Paul McCartney, Sting, Kiss, Bruce Springsteen, Oasis) and engineer/mixer extraordinaire Richard Chycki (Rush, Dream Theater, Aerosmith).


Don’t Forget The Basics

This 1966 Gibson Falcon amplifier is ready to rock, miked with both a Royer R-121 ribbon microphone and a Sennheiser MD-421 II cardioid dynamic mic.

There’s a reason I’m going to say “start with a Shure SM57.” That’s simply because it works and we’ve all heard it on countless hit records. Stick one of these trusty desert island gems a few inches from the outside cone of a speaker and turn up the preamp. Boom—instant damn good guitar sound.

There are plenty of other mics that can get the job done on their own. For a smoother sound, I’ve used ribbon mics like the Beyerdynamic M 160 and Royer R-121. An AKG C414 large-diaphragm condenser mic covers a lot of ground on its own and features the ability to record multiple polar patterns. For a bigger, thicker sound, the Sennheiser MD-421 II cardioid dynamic mic is one of my favorites, along with a Neumann U 87 (or 67 tube mic if available).  Each of these has their own ‘frequency sweet spot,’ so use to taste.

Don’t be afraid to move the mic around the cone area, experimenting with what part of the speaker sounds best, or for that matter, which speaker on the amp sounds best. Also, experiment with the distance of the mic on the speaker. For example, when I’ve recorded guitar great Ace Frehley, he always likes to put the mic right up against the grill of his 4X12 Marshall cabs. This helps deliver a nice thick tone due to the extra bass from the proximity effect of the mic being so close. Ever since, I’ve pretty much done the same thing, maybe moving it back a few inches on occasion, but I’ve found that for the most part, keeping the mic in tight usually delivers the right attitude.


The More Mics, The Merrier

The real fun starts when you introduce several mics (and amps) into the picture. Reaching out to my good friend Neil Dorfsman, he had a few ideas on the topic. “While I’m not necessarily of the opinion that ‘if using one mic is good, using two is better,’ I tend to try and capture multiple representations of electric guitars sounds,” he notes. “For me, there’s so much complex harmonic content that I find one or two mics just don’t do the trick.”

Dorfsman uses a number of setups, but there’s one he turns to the most. “When I mic an electric guitar cabinet, I’ll normally set up two ‘midrange / punchy’ mics—usually a Shure SM57 or Sennheiser MD-421—with one on-axis and one angled about 30 degrees off-axis,” he said. “Then one smooth, less ‘peaky’ mic (usually a ribbon such as a Royer, AEA, RCA 77-DX or Beyer M 160) and one ‘hi-fi’ representation (usually a -20 dB padded AKG C451), and possibly also a ‘full-sounding’ large diaphragm condenser (Neumann U 67, U 47 and so on). In addition, I’ll do a slightly distant ambient pair of large diaphragm condensers, such as U 87s.

How To Choose Your Next Studio Microphone – The Complete Guide

“That is a lot of mics and requires some ‘time and phase alignment’ to make it work,” he continued. “Depending on the sound I’m trying to capture, the diaphragm will be anywhere from 1 to 4 inches away from the cone. The mics are placed in various and different positions, depending on their sonic character and the speaker’s sound. I submix them as I am recording—keeping only the ‘ambient mics’ separate for mixing later. I’ve found it helpful to always also take a DI [from the amp] as well, which can later be re-amped or processed with an amp simulator plug-in while mixing.”


Checking In with Chycki

Richard Chycki takes a variety of approaches, too, when it comes to miking a guitar, ensuring that he has lots of possibilities to work with when it comes time to mix.

“I split the guitar signal, usually with a Radial JD7 for larger setups or a Radial X-Amp 500 for a two-amp split,” he notes. “I always record a guitar DI for both re-amping possibilities and editing, as distorted guitars usually look like an audio sausage [in a DAW, making it] a bit difficult to find transients for editing.”

“For Alex Lifeson from Rush, we set up a string of amps, cabinets and mics and create tone presets on the console as we work,” he said. “The main amp is miked with a Royer R-121, a Mojave Audio MA-301fet and a Shure 57. I don’t EQ the mics individually but use placement and balance between the three mics, submixing to a buss where I have a Pultec EQP-1A EQ and a Urei LA-3A leveling amplifier, and then go to the DAW.

“We do prefer Celestion G12M or Vintage 30 guitar speakers and larger 4×12 cabinets, like Marshall TV or Mesa Boogie Rectifier cabs,” he noted. “For a session as complex as Rush, we had an assortment of other amps connected, including a Mesa Boogie Mark V, a version of a Lerxst Omega [Lifeson’s signature model guitar amp], an Orange OR-120, a 20-watt Hi-Watt, and a Bogner Uberschall. We also used a Roland JC-120 [Jazz Chorus Stereo Combo] processed separately and miked in stereo to capture the full chorus width. All of the amps were miked with combinations of Shure SM57, Royer R-121, Sennheiser MD-409, Shure SM7, Neumann U 47 fet and, of course, the triad of mics mentioned earlier.”

Room ambience is a crucial seasoning for your sound that your mics can provide, depending on your tone and taste. Sometimes you want it, and sometimes you don’t. As Chycki explained, for recording Lifeson, “A pair of Royer R-121s set up using Blumlein Pair technique, and Earthworks SR30s set up X-Y are always on hand for room ambience, if needed. However, for recording John Petrucci’s guitar for Dream Theater, we used the ‘guitar condom.’ The GC is a hut made from bales of Roxul rock wool insulation that encapsulate the guitar cabinet and microphones, completely removing any room sound from the close microphones.”

Capturing big guitar sounds can be as simple as placing a single mic in front of an amp to creating complex setups with DIs and a myriad of sonic options. Take the time to move the mic(s) around, check your phase, check the speaker and experiment. Subtle changes can make a big difference in the final product. Just remember—if it sounds right, it is right, no matter what the setup.

Mesa Boogie CabClone – A Real-World Review

Mesa Boogie CabClone

For those of you who want to record huge guitar sounds with your own amps at home without using loud cabinets or mics, the Mesa Boogie CabClone IR Guitar Speaker Cabinet Simulator can handle the job. As a digital cabinet simulator/impulse response reader (IR), this small but sturdy unit lets users choose from 16 popular Mesa cabinets and classic microphone configurations. Just plug your favorite amp or head’s speaker output into the CabClone IR, choose one of the preconfigured cabinet/mic combo IRs and send the signal to your preamp and DAW.

For me, this is great because I have a number of amps and heads that I like to track through, including my Mesa Boogie MK IV head, Mesa Boogie Mini Rectifier head, two small Orange heads and a Fender Princeton Reverb amp. With the CabClone IR, I can get the sounds of those classics without miking up cabinets or scaring the neighbors.

Layout is very straight forward, with Input, Output and Presence knobs and a Cab Select knob to choose the row of eight IRs and a Bank A / Bank B switch to select between them. Bank A is called Live and features a number of classic Mesa cabinets miked up with a Shure SM57 and Beyerdynamic M 160 Double Ribbon. Bank B is called Studio and features the same cabinets but miked with a tube Neumann U 67 Condenser and a Royer R-122 Ribbon mic.

There’s a small LED meter that will light red if you’re clipping, and the cool blue LED on top lets you know it’s working. The box is mounted on large rubber legs to fit nicely on top of your amp above the handles, and the rear features a XLR DI output, MIDI I/O for program switching, ¼ inch headphone jack, a ground lift switch, phase switch and a ¼ inch Line Out (DRY) which outputs an unprocessed signal directly from the input jacks. There’s a USB port to manage the IRs on your desktop and a ¼ speaker output to hear a cabinet if need be. There’s a small signal-triggered cooling fan on the side that sometimes turns on automatically and can be heard if you have the unit right next to you, which I do not (so I don’t hear it).

Mesa Boogie CabClonePart of the fun of this box is the simplicity of recording with it. I just plug into an amp head, run the output to the CabClone IR, choose a cabinet/mic combo and output the XLR to my preamp/DAW. To dial in the best sounds, I use a combination of pedals, controls on the head, cab/mic IR choice and the useful Presence knob. Within a few minutes, with a few twists and turns, you can be tracking some huge guitar sounds with minimal effort and no mics or cabs blazing away.

Also, to push the sonic boundaries of this unit, I downloaded some great IRs from heavy metal producer Jens Bogen. Since I record a lot of hard and heavy 6, 7 and 8 string guitars for my TV work, this IR pack is perfect for getting massive guitar sounds. To load them in, I simply connected the USB jack on the CabClone IR and loaded them into the bank folders on that appear in the Mesa IR folder on my desktop. For me, I used the Bogen IRs in slots 6, 7 and 8, both in Banks A and B. The rest of the slots, I kept stock. This lets me get any number of options out of the box and since I double-track everything, I just switch between them to diversify the tones.

The CabClone IR is a great option if you want to get that classic sound of a miked-up cabinet without the hassles. It gives you some great sonic options for tones, and the ability to include third-party IRs makes it infinitely expandable. For big guitar sounds from your own gear, it’s definitely a solid choice in more ways than one.

Mesa Engineering • www.mesaboogie.com

Softube Summit Audio Grand Channel – A Real-World Review

Softube Summit Audio Grand Channel

The Summit Audio Grand Channel by Softube is an emulation of the Summit Audio EQF-100 equalizer and TLA-100 compressor combined into a single channel strip perfect for adding analog-like vibe to your mixes. The first thing you’ll notice about the Grand Channel is it has character. Just by putting it on your tracks with all the settings flat, you’ll hear it adding its signature sound.

The EQ section features four bands plus high and low pass filters. Each of the four bands has seven expertly chosen selectable center frequencies, a bandwidth control, a cut/boost/bypass switch and a gain knob to control how much you’re boosting or cutting. The two mid bands are bell filters, and the high and low bands can be set to either bell or shelf shapes. I would consider this to be a tone shaper as opposed to more of a surgical EQ. You’re really able to make extreme moves with this EQ, drastically altering the sound of your tracks without ever making it sound unnatural.

You almost can’t make this thing sound bad. The low band is perfect for adding weight and warmth to bass or drums. The high band is incredibly silky and smooth, perfect for adding air to vocals or acoustic guitars. We were amazed how far we could push the high end with this EQ without it ever getting harsh. We found the mid bands to be great for sitting guitars into the mix, pushing anywhere between 1.5 and 4k to help the guitars cut through a dense mix or cutting in the same area to tame overly aggressive tones.

Softube Kerry King Signature Plug-In — A Real-World Review
Eventide H3000 Factory Plug-In — A Real-World Review
Focal Elegia Closed-Back Reference Headphones—A Real-World Review

Moving on to the compressor, we have a gain reduction knob to control the amount of compression, a makeup gain knob and two switches to choose between fast, medium, and slow attack and release times. Softube took this compressor one step past its analog counterpart by adding a few new features.

For one, there’s a wet/dry knob for effortless parallel compression—a feature I wish every compressor had. Softube also added a low cut filter which can be placed either in the audio path or in the compressor’s sidechain detection path. The low cut can go all the way up to 600 Hz, so using it in the audio path is great for cutting out unwanted low end before your signal hits the compressor. Using it in the side chain detector path, on the other hand, is useful when compressing signals with a lot of low end like bass or drums to keep the low end from pumping the compressor too much.

Finally, there’s a saturation knob so you can control exactly how much analog character you want, from squeaky clean to gritty and anywhere in between. If I had to describe the sound of this compressor with a single word, it would be transparent. It’s capable of controlling even the most unruly tracks without making them sound over-compressed. This is one of the few compressors that really works for me on electric guitars, able to control the dynamics and bring the guitars forward in the mix without sounding squashed or flat. On bass, it’s the same story—you can really clamp down, locking it in place without taking the life out of the performance.

Softube • www.softube.com

Softube Kerry King Signature Plug-In — A Real-World Review

Softube's Kerry King Signature Plug-In.
Softube’s Kerry King Signature Plug-In.

If you love the sound of a cranked Marshall tube amp, but don’t like the noise complaints from your neighbors that come along with it, Softube may have you covered. At NAMM this year, the company announced the release of its new Kerry King Signature amp simulator plug-in, based on the now-discontinued Marshall 2203KK 100 watt tube amp. The amp itself is a modified Marshall JCM 800 with KT88 power tubes instead of the EL34 tubes you’d typically find in a JCM 800, plus an optional EQ boost and gate circuit.

The beauty of this plug-in, much like a real Marshall, is you turn it on and it just sounds good. We opened the plug-in with the default settings, heard one chord play through it, and guitarist/composer Rich Tozzoli said, “It sounds perfect! Hit record!”

The interface is extremely straight-forward, featuring your standard presence, bass, middle and treble controls for tone shaping, plus a master volume and pre-amp volume control for dialing in the perfect amount of crunch. Things get really fun when you hit The Beast button. This engages the extra EQ boost circuit, boosting the upper midrange and high end, tightening up the low end, and adding additional gain going into the preamp. The Assault Intensity knob allows you to dial in how much of this boost you want, from fairly subtle when all the way down to full-on brutal when cranked all the way up. The Beast mode also adds an incredibly easy to use and fantastic-sounding one knob gate to help cut out any noise introduced from all that extra gain. Just adjust the gate’s threshold to your liking and you’re good to go.

Moving on to the cab section of the plug-in, Softube gives you a ton of options to shape your sounds to your exact needs. The first tab in the cab section features five mix-ready preset mic combinations created by legendary engineer Terry Date at Henson Recording Studios, giving you a variety of tones with a simple click. The next tab gives you access to Kerry King’s live tone, with an impulse response captured by FOH engineer Chris Paccou at a 2018 Slayer show. If these presets aren’t working for you or if you prefer to get a little tweaky with your tone, the third tab has you covered. Here, you have control over seven different mics on Kerry King’s personal Marshall Mode Four 4×12 cabs. You can tweak the volume, pan, and phase of each mic, allowing you to create your own signature sound.

Eventide H3000 Factory Plug-In — A Real-World Review

The real beauty of this amp sim is how much fun it is to play; Rich Tozzoli commented how every time we dialed in a new tone, the sound of the amp would inspire him to come up with the perfect guitar part for the track. From blues and country to rock and metal, this amp gave all the tone and inspiration we could ask for.

Don’t think that this amp is only for guitars though. We also ran B3 organ through it for some super crunchy keyboard parts inspired partly by the sounds of Deep Purple’s Jon Lord. In addition to this, we also used it on bass in some heavy rock tracks. By blending a cleaner, more traditional bass tone with a copy running through the Kerry King Signature amp for some distortion, we were able to get a monstrous bass tone that could stand up to and cut through a massive wall of guitars and drums.

Softube • www.softube.com

Roland JU-06A Sound Module: A Real-World Review

Our review team recently put the Roland JU-06A Sound Module to the test while in the Virgin Islands
Our review team recently put the Roland JU-06A Sound Module to the test while in the Virgin Islands.

Another perfect fit for the “compact” theme, the Roland JU-06A Sound Module was not only a pleasure but a problem-solver for quite a few of the cues we had to deliver. Essentially the sound and control of a Juno 106 in a four-voice compact package, it’s a perfect example of how certain limitations can make some things easier to achieve. Being familiar with the classic single OSC polysynths from the early ’80s, we depended on the Chorus effect that was so loved from those days for thickening and smoothing the different patch settings.

When taking it a step further, we used the pulse width modulation capability to make it sound like a slightly detuned two-OSC polysynth, offering up sweet strings and big pads with swirling filtering and spacey resonance.

Sony C-100 Two-Way Condenser Mic: A Real-World Review
Yamaha EAD10 Drum Module – A Real-World Review
IK Multimedia iLoud MTM Studio Monitors—A Real-World Review

On one dramatic crime-like track, we actually used the JU-06A for every sound. We began with a kick drum, adding in a snare and hi-hat, crash cymbal and toms. Each of these sounds is achieved by blending the OSC with the noise source and simultaneous high- and lowpass filters to get a variety of small and light as well as huge and punchy sounds.

For bass, I used the pulse width modulation via the ENV rather than the LFO so as to mimic the pluck of a bass string that mellowed and got richer as it decayed. From there, we went for an electric piano sound similar to the “No Quarter” tone from Led Zeppelin’s classic song, so we set up the filter mod by the LFO, set the quivering LFO rate, and the vibe was just right. The sub OSC blend added the lower octave when we needed to get the super bottom bass sweeps and pulsing eighth notes that the tracks demanded. The Chord memory function, arpeggiator and hold were so much fun to pepper in and out while synced to MIDI clock that I simply forgot we were only dealing with four voices of polyphony.

The presets were great, but the Roland JU-06A Sound Module is so easy and quick to program, we didn’t need them on this trip. Aside from that, there’s quite a bit under the hood, with 23 parameters accessible via the front control panel. Additionally, the JU-06 will slide into an optional Roland K-25m keyboard unit for easy control.

Select your currency